

- Best 40 HP Outboard Motor Worth Investing In - October 1, 2022
- Trailer Hub and Bearing Assembly Guide - November 17, 2021
- How to Winterize Your Outboard Motor - October 22, 2021
We have all seen it before–while traveling down the road, there it is. A boat and trailer parked on the shoulder missing a wheel. The unfortunate owner of the boat and trailer has had to disconnect the tow vehicle and leave a prized possession on the side of the road where it is susceptible to theft or vandalism. Even worse, it can create a hazard for other drivers and could be hit by another vehicle. In addition, it is understood that a wheel that has separated from the trailer at highway speed poses an extreme risk to other motorists.
More than likely, the missing wheel and hub or brake drum was the result of failed wheel bearings. If the wheel bearings failed, the trailer hub and axle spindle may also be damaged or destroyed. This trailer hub and bearing assembly guide cover the inspection, maintenance, and replacement procedures necessary to keep your trailer axles in top condition.
According to Boat US, 77 percent of all calls for roadside assistance are trailer related and 22 percent of those calls are the result of wheel bearing failures.
Wheel bearings fail for a variety of reasons, the most common being insufficient lubrication, improper adjustment, and dirt and water (especially salt water) intrusion.
When to Service Your Trailer Hub and Wheel Bearings

Service your boat trailer bearings at least once per year or every 3000-3500 miles, whichever comes first (even if your trailer is equipped with bearing protectors). Because boat trailers are frequently submerged in water, service your trailer wheel bearings more frequently than bearings on a regular trailer. Even traveling a short distance will create heat inside the hub. Backing the trailer into the cool water will cause a vacuum to develop inside the hub which can draw water into the hub; therefore, sit at the launch ramp for a few minutes to allow the bearings to cool before submerging the axles in the water to help prevent water intrusion. Use this opportunity to load your coolers, lunch, fishing gear, and other items necessary for a fun day on the water.
I always perform a quick touch test after pulling my trailer and boat any distance. To do so, simply touch each wheel hub and note if any are noticeably hotter than the others are. You can touch the hub on normally operating bearings without burning your fingers. If any hub is considerably hotter than the remaining hubs, that hub will require service at your soonest opportunity.
Before a long trip, raise each wheel off the ground and give the wheel a good spin. The wheel should turn freely. Grinding, rumbling or any unusual noise indicates that the bearings may be failing. Be aware, however, that hubs that contain the braking system will normally make more noise than an axle without a brake. Next, grab the tire at the top and bottom and attempt to shake the tire. There should be very little in-and-out play in the wheel. Excessive play indicates that the bearings require adjustment or the bearings may be failing.
Bearing Protectors
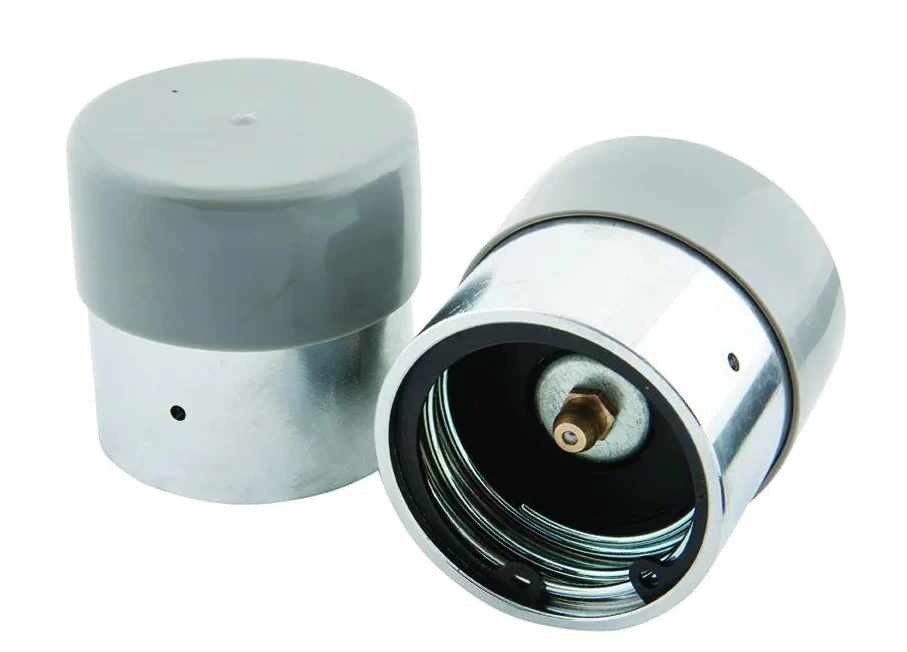
A typical bearing protector is a metal cap that replaces the standard dust cap on a trailer axle. Bearing protectors allow you to add grease to the bearings and hub without removing the tire and hub. The bearing protectors are equipped with zerks or grease fittings that allow you to add grease using a grease gun. Most bearing protectors are spring-loaded–the grease pumped into the hub is kept under slight pressure to prevent dirt, dust, water, or other contamination from entering the hub.
When using a bearing protector, it is important to always use the same grease–the thickening agent in the grease may not be compatible with another grease. If in doubt, disassemble the hubs and thoroughly clean all of the old greases from the hubs and bearings (add link).
Bearing Buddy

Although several bearing protectors are commonly available, The Bearing Buddy brand is the most prevalent in the marketplace. The Bearing Buddy bearing protector is simple to install and simple to use.
To install the Bearing Buddy, pry off the original dust cap using a hammer and slotted (flat blade) screwdriver. Next, carefully tap the Bearing Buddy into the hub bore using a soft mallet or hammer and block of wood. Fully seat the Bearing Buddy in the hub as shown in the image below.

To determine what size Bearing Buddy that you require, carefully measure the inside diameter of the hub using a Vernier caliper or inside micrometer. The original dust cap was removed from this bore. The most common sizes on boat trailers are 1.980 inches (50.29 mm) and 2.080 inches (52.83 mm). You can use the table below to determine the Bearing Buddy part number using the inside diameter of the bore.
| Part Number | Inner Diameter | Supplied With Bra | Number Per Package | Stainless Steel |
| BB178SSBP | 1-¾ in. (45 mm) | Yes | Two | Yes |
| BB198BP | 1.98 in. (50 mm | Yes | Two | Yes |
| BB2047BP | 2.047 in. (52 mm) | Yes | Two | No |
| BB2328BP | 2.328 in. (59 mm) | Yes | Two | Yes |
| BB2440BP | 2.440 in. (62 mm) | Yes | Two | Yes |
To determine if you need to add grease, push on the piston using your fingers. If you can move the piston or rock it back and forth, the hub does not need any grease. To add grease to the hub, first, raise the wheel off the ground using a suitable jack. Attach a grease gun to the zerk on the Bearing Buddy and apply 2-3 pumps while rotating the wheel. As you pump grease into the hub, the piston on the Bearing Buddy will move outward against the spring. Some grease will leak out from around the piston, which vents air and excess grease to prevent pushing the inner seal from its bore. When the grease begins leaking around the piston, the hub is full. Always service your wheel bearings each 3000-3500 miles or yearly even if your trailer is equipped with bearing protectors. In addition to Bearing Buddy protectors, several different brands are available from Amazon.
- Camco 50052 Bearing Protector
- Goldenrod Dutton-Lainson Grease Keeper
- Shoreline Bearing Protectors
- Fulton Bearing Protectors
EZ Lube Spindle
Similar to other bearing protectors, EZ Lube Spindles have a metal cap that is installed in place of the regular dust cap. In the center of the EZ Lube cap is a rubber plug that covers the grease zerk. Remove the rubber plug to expose the zerk.
EZ Lube Spindles have a drilled passageway from the tip of the spindle to just inside the inner wheel bearing. The passageway has a grease zerk installed in the tip of the spindle as shown below.

An easy way to identify an EZ Lube spindle is the rubber plug located in the center of the metal cap.

When pumping grease into an EZ Lube spindle, the grease is pushed from the zerk toward the inner bearing. Therefore, as the grease fills the hub cavity, it moves outward and vents the old grease, air, and other contamination from the hub. This is considered a nice benefit compared to standard bearing protectors as most of the old grease can be forced out of the hub cavity.
Packing Wheel Bearings
Packing wheel bearings with new grease is a messy job, but not difficult. It is, however, a necessary service to prevent bearing failure. Because the trailer is frequently submerged in water, the chance of water intrusion is very likely. The tools and supplies required are:
- Wirecutter pliers
- Adjustable pliers
- Seal driver
- Floor jack or bottle jack
- jack stands
- Lug nut wrench or impact driver and socket
- Rags or towels
- Slotted (flat-blade) screwdriver
- Bearing packer (optional
- Grease gun
- Marine-grade wheel bearing grease
- Solvent (mineral spirits or paint thinner)
Disassembly

It is good practice to attach the trailer to a tow vehicle to prevent it from rolling fore or aft while loosening the lug nuts or bolts. If this is not practical, block the tires using wheel chocks or suitable blocks of wood. After loosening the wheel nuts, raise the tires off the ground using a jack. NEVER work around a trailer supported with just a jack–always support the trailer with jack stands or blocks of wood. Place the jack stands under the trailer axle(s) near the inside the axle hubs.
- Finish removing the lug nuts or bolts and remove the tires and wheels.
- Remove the dust cap or bearing protector. Separate the dust cap from the hub using a hammer and slotted screwdriver. If equipped with a bearing protector, tap on the side of the bearing protector using a soft-faced mallet or hammer and block of wood.
- Next using wire cutting pliers or needle-nose pliers, straighten the ends of the cotter pin and remove it from the spindle nut (commonly called a castle nut) and spindle.
- Unscrew and remove the spindle nut and spindle nut washer, then slide the hub off the spindle. Remove the outer wheel bearing from the hub.
- Next, pry the inner seal from the hub using a suitable prying tool or seal removal tool. It may be necessary to record the seal part number, so try not to destroy it.
Cleaning and Inspection
Always wear eye protection and rubber gloves with working with compressed air and solvent. Never use gasoline as a cleaning solvent.
First, wipe the old grease from the bearings and bearing races inside the hub. Using a suitable solvent, clean the bearings and dry using compressed air. When drying the bearings using compressed air, do not spin the bearings at high speed. After the bearings and races are clean, carefully inspect them for corrosion, spalling or flaking, discoloration, or water contamination. If you have any doubt whatsoever regarding the condition of the bearings and races, replace them. Ensure that the bearings and races are in perfect condition if you intend to reuse them. If a bearing failure occurred, carefully inspect the axle spindle for excessive wear or damage–replace the spindle if necessary.
If bearing replacement is necessary, record the part numbers etched into the bearings and races. The numbers can be cross-referenced when purchasing individual bearings or bearing kits. The bearing kits are available that include the inner seal, inner and outer bearings, and inner and outer races. Bearing kits are readily available from Amazon and most auto parts stores. For boat trailer applications, the inner seal must be the double-lip design; the inner lip holds grease in the hub and the outer lip keeps water from entering the hub.
The chart below shows a bearing and hub kit selection guide available through Amazon.com
To replace the hub assembly, there are two things that you need to know: the number of wheel studs or bolts and the hub bolt circle diameter. Most boat trailers have either a four-bolt or a five-bolt hub. To determine the bolt circle measure as shown in the drawing below. It is best to measure with the hub removed so the trailer spindle does not interfere with your measurements.
Trailer Hub and Bearing Assemblies
Ultra-Tow Ultra Pack Trailer Hub–available from Northern Tool & Equipment
- Five bolt, 4-1/2 inch bolt circle.
- Includes the hub, bearings, seal, grease zerk, dust cap, and lug nuts.
- Use existing spindle
- Includes dust cap or bearing protector installation tool
- Comes fully assembled
Seachoice Trailer Wheel Hub Kit–available from Amazon.com
- Five-bolt, 4.5 inch bolt circle
- Includes pre-lubricated bearings
- Includes bearings, seals, dust caps. lug nuts and cotter pin
- Cast galvanized hub specifically designed for boat trailers
Tie Down Engineering Super Lube Marine Hub Kit–available from Amazon.com
- Five bolt with 1740 pound capacity
- Includes lug nuts bearings, seals, bearing protector cap, and cotter pin
- Bearings are pre-lubricated
Always replace the bearing and race as a pair. If you install a new bearing into a worn or damaged race, the damaged race will destroy the new bearing. Likewise, a worn or damaged bearing will destroy a new race. In addition, make sure the race fits tightly inside its bore in the hub. Replace the hub if the race is loose in the hub. To remove the race, insert a punch into the hub from the opposite side of the race and tap it out of the hub using a hammer. Install the new race, first lightly tap the race into its bore using a small hammer. Make certain that the race is started straight in the bore without slanting in any direction. Then, use a suitable driver that contacts just the outer diameter of the race and tap it into its bore. For example, the old race can be used to drive the new race into the hub. Some like to use a socket of the appropriate size. Drive the race into the bore until fully seated.
Packing the Bearings
Purchase a good quality marine-grade wheel bearing grease.
Quicksilver 2-4-C Marine Grease

Pros
- Superb quality and versatile lithium-base grease
- Tube fits standard grease guns
- Effective and dependable general use grease
- Tends to not break down when water is present
Cons
- Expensive when compared to other greases on the market
Star-Brite Wheel Bearing Grease

Pros
- Insoluble with water
- Excellent corrosion prevention
- Excellent heat tolerance
Cons
- Expensive compared to other greases
Sta-Lube Marine Grease for Boat Trailer Wheel Bearings

Pros
- Designed for harsh conditions
- Excellent water resistance
- Excellent water wash-out properties
Cons
- Not recommended for trailers equipped with disc brakes
- Susceptible to melting and leaking
Lucas Oil Marine Grease

Pros
- Excellent heat tolerance
- Superior water resistance
- Excellent corrosion resistance
Cons
- Cartridge is an irregular size–may not fit your grease gun
Packing wheel bearings is a messy job. However, you can considerably reduce the messy part by using a bearing packer. There is a wide variety of bearing packers available; some are inexpensive especially compared to a commercial version.
To use a bearing packer, simply place the bearing into the packer, tighten the flange snuggly onto the bearing and pump grease into the bearing using a grease gun. Using a bearing packer will also flush the old grease from the bearing. Some inexpensive bearing packers are available from Amazon.com and can be purchased for under $20.00.
- LockNLube Universal Bearing Packer
- Lumax LX310 Universal Bearing Packer
- Plews & Edelman 70-025 Deluxe Bearing Packer
If a wheel bearing packer is unavailable, you can do a good job by squeezing the grease into the bearing by hand. Just place a liberal lump of grease into the palm of your hand and rock the bearing into the grease. Continue until the grease surrounds each of the bearing rollers. Then smear a coat of grease around the outer diameter of the bearing.
Assembly
After packing the bearings, smear a liberal quantity of the wheel bearing grease onto the races.
- Make sure the inner bearing is seated on the inner race, then tap the seal into its bore. Be sure to start the seal straight in the bore. Tap into place using an appropriate driver or block of wood. Drive in the seal until seated or flush with the surface of the hub.
- Slide the hub onto the spindle until seated on the shoulder at the base of the spindle.
- Slide the outer bearing onto the spindle and seat it against the outer race.
- Install the spindle washer and castle nut.
- Tighten the nut finger tight, then an addition 1/4 turn using pliers while rotating the hub 10-15 rotations.
- Loosen the nut for approximately 1/2 turn, then while turning the hub, tighten the nut again until there is no play in the hub. Grasp the edges of the hub and attempt to rock it; there should be very little or no play. The adjustment you are after is no preload, but no play.
- Once the adjustment is correct, align a slot in the castle nut with the hole in the spindle and install a new cotter pin–do not reuse the old cotter pin. Bend over the ends of the cotter pin to lock in place.
- Install the dust cap or bearing protector into the hub to complete the job.
In conclusion, you can now be confident that you will not experience any axle or wheel bearing issues on your next trip to your favorite lake or body of water. In just a few hours of work, you have performed a vital service to ensure your trailer wheel bearings are in good condition and able to resist the heat, dust, dirt, and water commonly encountered while towing your boat.

FAQs
Answer: Even if your trailer is equipped with bearing protectors, you should still service your bearings once per year or every 3000-3500 miles, whichever comes first.
Answer: It is possible to overfill a bearing hub and cause the inner seal to be pushed from its bore.
Answer: You will see the internal piston in the bearing protector extend as grease is pumped into the zerk. As the piston extends, air and old grease will leak around the piston indicating that the hub is full.
Answer: Bearing Buddy bearing protectors have a spring-loaded piston that maintains a slight positive pressure inside the hub. Therefore, they will help prevent water intrusion, but ultimately, water will enter the hub.
Answer: Bearing failure is most frequently caused by insufficient lubrication which results in excessive friction and heat. Overloading (too much weight for trailer capacity) and incorrect bearing adjustment are also leading causes of bearing failure on trailers.
Looking for more interesting readings? Check out: